Get to know Samantha from Green Pig Farm!!

Well, guys, I finally did it!! I met with Freddy Vasquez from FXV Digital, where we donned headphones and turned on the mics to talk about homesteading. This was the first I’ve ever done a podcast, but had so much fun recording it! We talked about how Green Pig Farm started, what keeps us busy, why we do what we do, and more!

You might be wondering Fred and I connected with each other. We have daughters who played volleyball together years ago. A simple carpool arrangement turned into nearly a decade-long friendship. He mentored me when developing a brand and website for Green Pig Farm. In return, we shared our garden bounty and homemade baked goods. (Ask him about our bread!) Fred is an awesome person –super genuine and honest, and a Green Pig Farm lover. To be honest he loves and supports lots of local businesses…not just us.

Here’s Fred’s Podcast summary: Samantha Shaak is a local school teacher who decided to put a cucumber plant in the ground many years ago and the rest is history. Homesteading is now her passion and Samantha hopes to inspire others to take control of their life through their food.

You can find the recording here: FredTalk #33 | Samantha Shaak

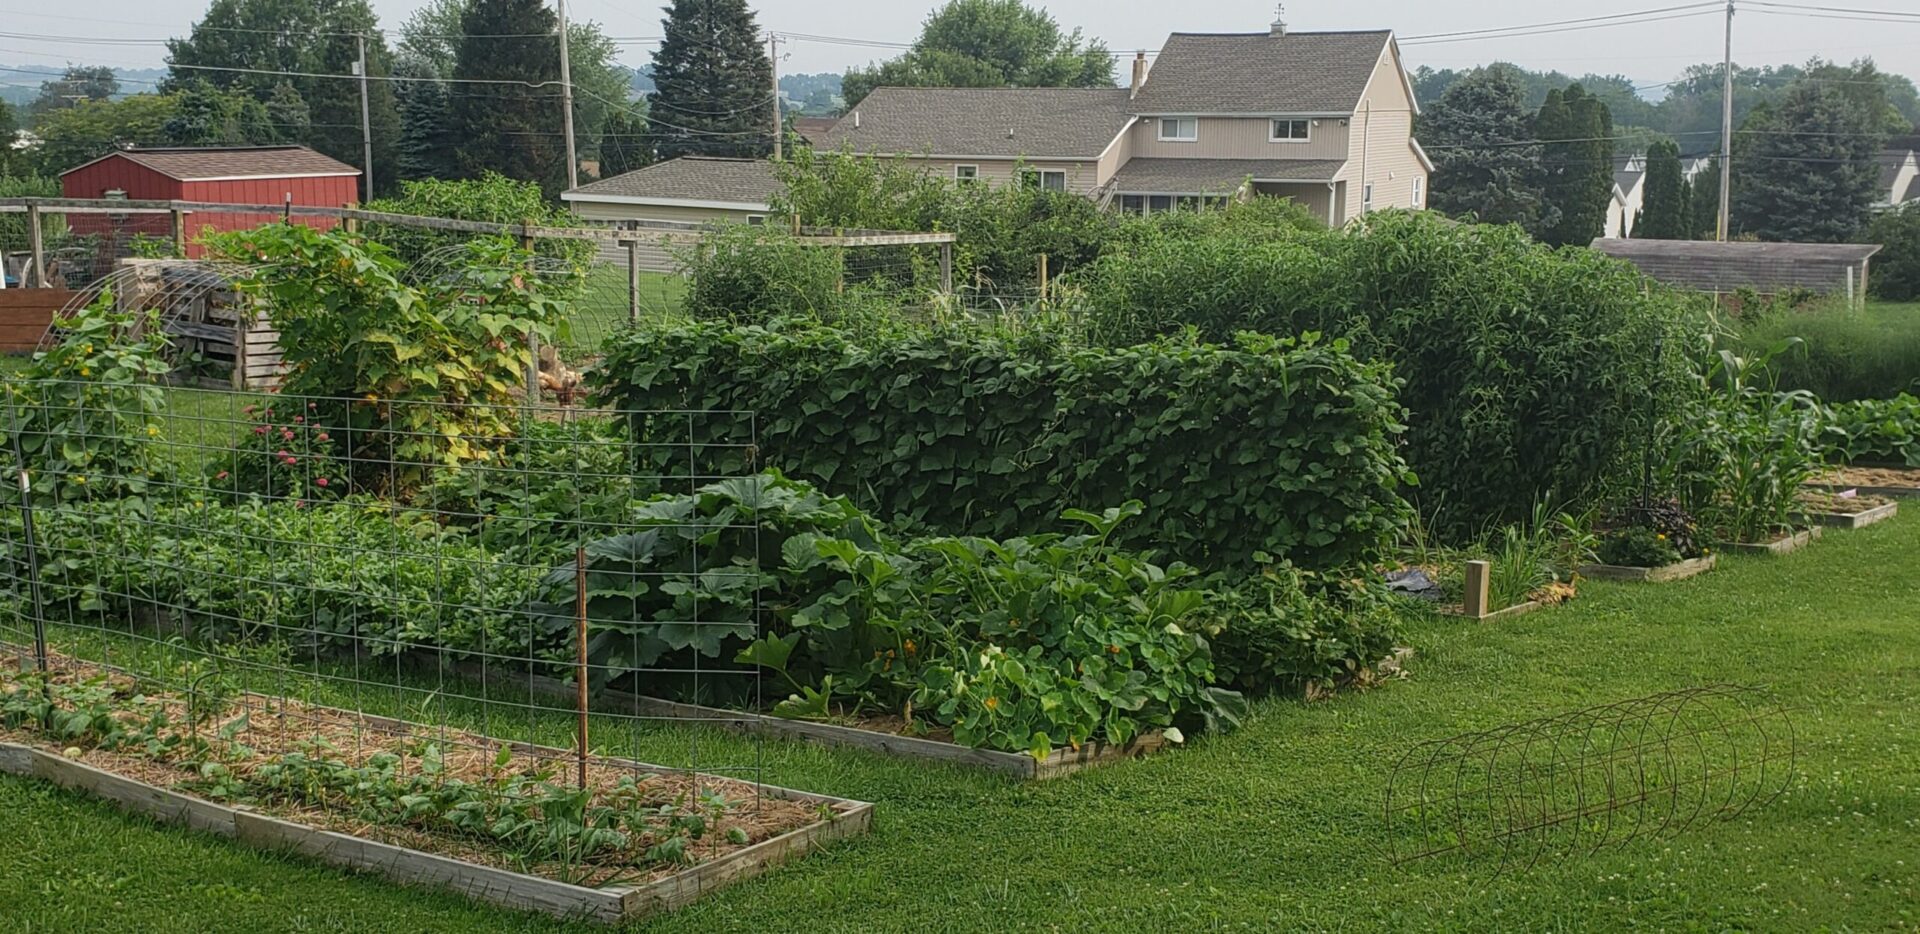
What Does Green Pig Farm Grow in Their Garden?

We often get questions about what we grow in the garden, so we thought we’d share what we have planted this year, as well as how we preserve it. This list will not only include where we originally purchased the seeds (since we now seed save), but also links to other resources we thought might be helpful. We’ll start with our favorite category: legumes.

Legumes

Legumes are our number one crop because of their versatility. This group includes things like beans, peas, peanuts, and even clover. If you want to know why this is our favorite category, check out our post: The #1 Garden Item to Plant.

Here is what we are growing this year and how we will preserve the harvest:

Nightshades

Nightshades are a group of fruits and veggies that contain solanine, including tomatoes, peppers, and potatoes.

  • Tomatoes
    • Yellow Pear (fresh eating)
    • Red Cherry (fresh eating)
    • Brandywine beefsteak (fresh eating, water bath canned, dehydrated)
    • Roma V (water bath canned)
    • San Marzano (water bath canned)
  • Peppers
    • Cayenne (water bath canned, dehydrated)
    • Jalapeno (frozen, water bath canned, pressure canned)
    • Alma Sweet Paprika (dehydrated)
    • Criola de Cocina (frozen)
    • California Wonder (frozen)
    • Habanero (dehydrated, water bath canned)
    • Tangerine Dream (fresh eating)
    • Sweet Long Blend (fresh eating)
    • Golden Marconi (frozen)
  • Potatoes
    • Yukon Gold (cold storage)
  • Eggplant
    • Black Beauty (frozen)

Brassicas

Brassicas are often referred to as cole crops (sometimes mistaken for “cold crops”). These plants can usually be planted when it is a bit colder, before the first frost. If planted for a fall harvest, they will tolerate a light frost, too. Some even say frost improves the flavor of these veggies.

Grain

  • Peaches and Cream Sweet Corn (frozen)

Curcubits

Curcubits include cucumbers, summer and winter squash and melons. Curcubits provide some of the best fresh eating and long term storage items, in our opinion.

Umbellifers

This small group of items include celery, carrots and even parsley.

Alliums

Alliums include some of the best aromatics, garlic and onions. In addition to providing lots of flavor, both of these items are easily stored for later consumption.

Herbs and Greens

  • Dwarf Jewel Mix Nasturtium
  • Purple Basil (dried)
  • Sweet Basil (dried)
  • Dill weed (dried)
  • Rosemary (dried)
  • Thyme (dried)
  • Oregano (dried)
  • Red Romaine Lettuce

Fruits and Berries

Miscellaneous

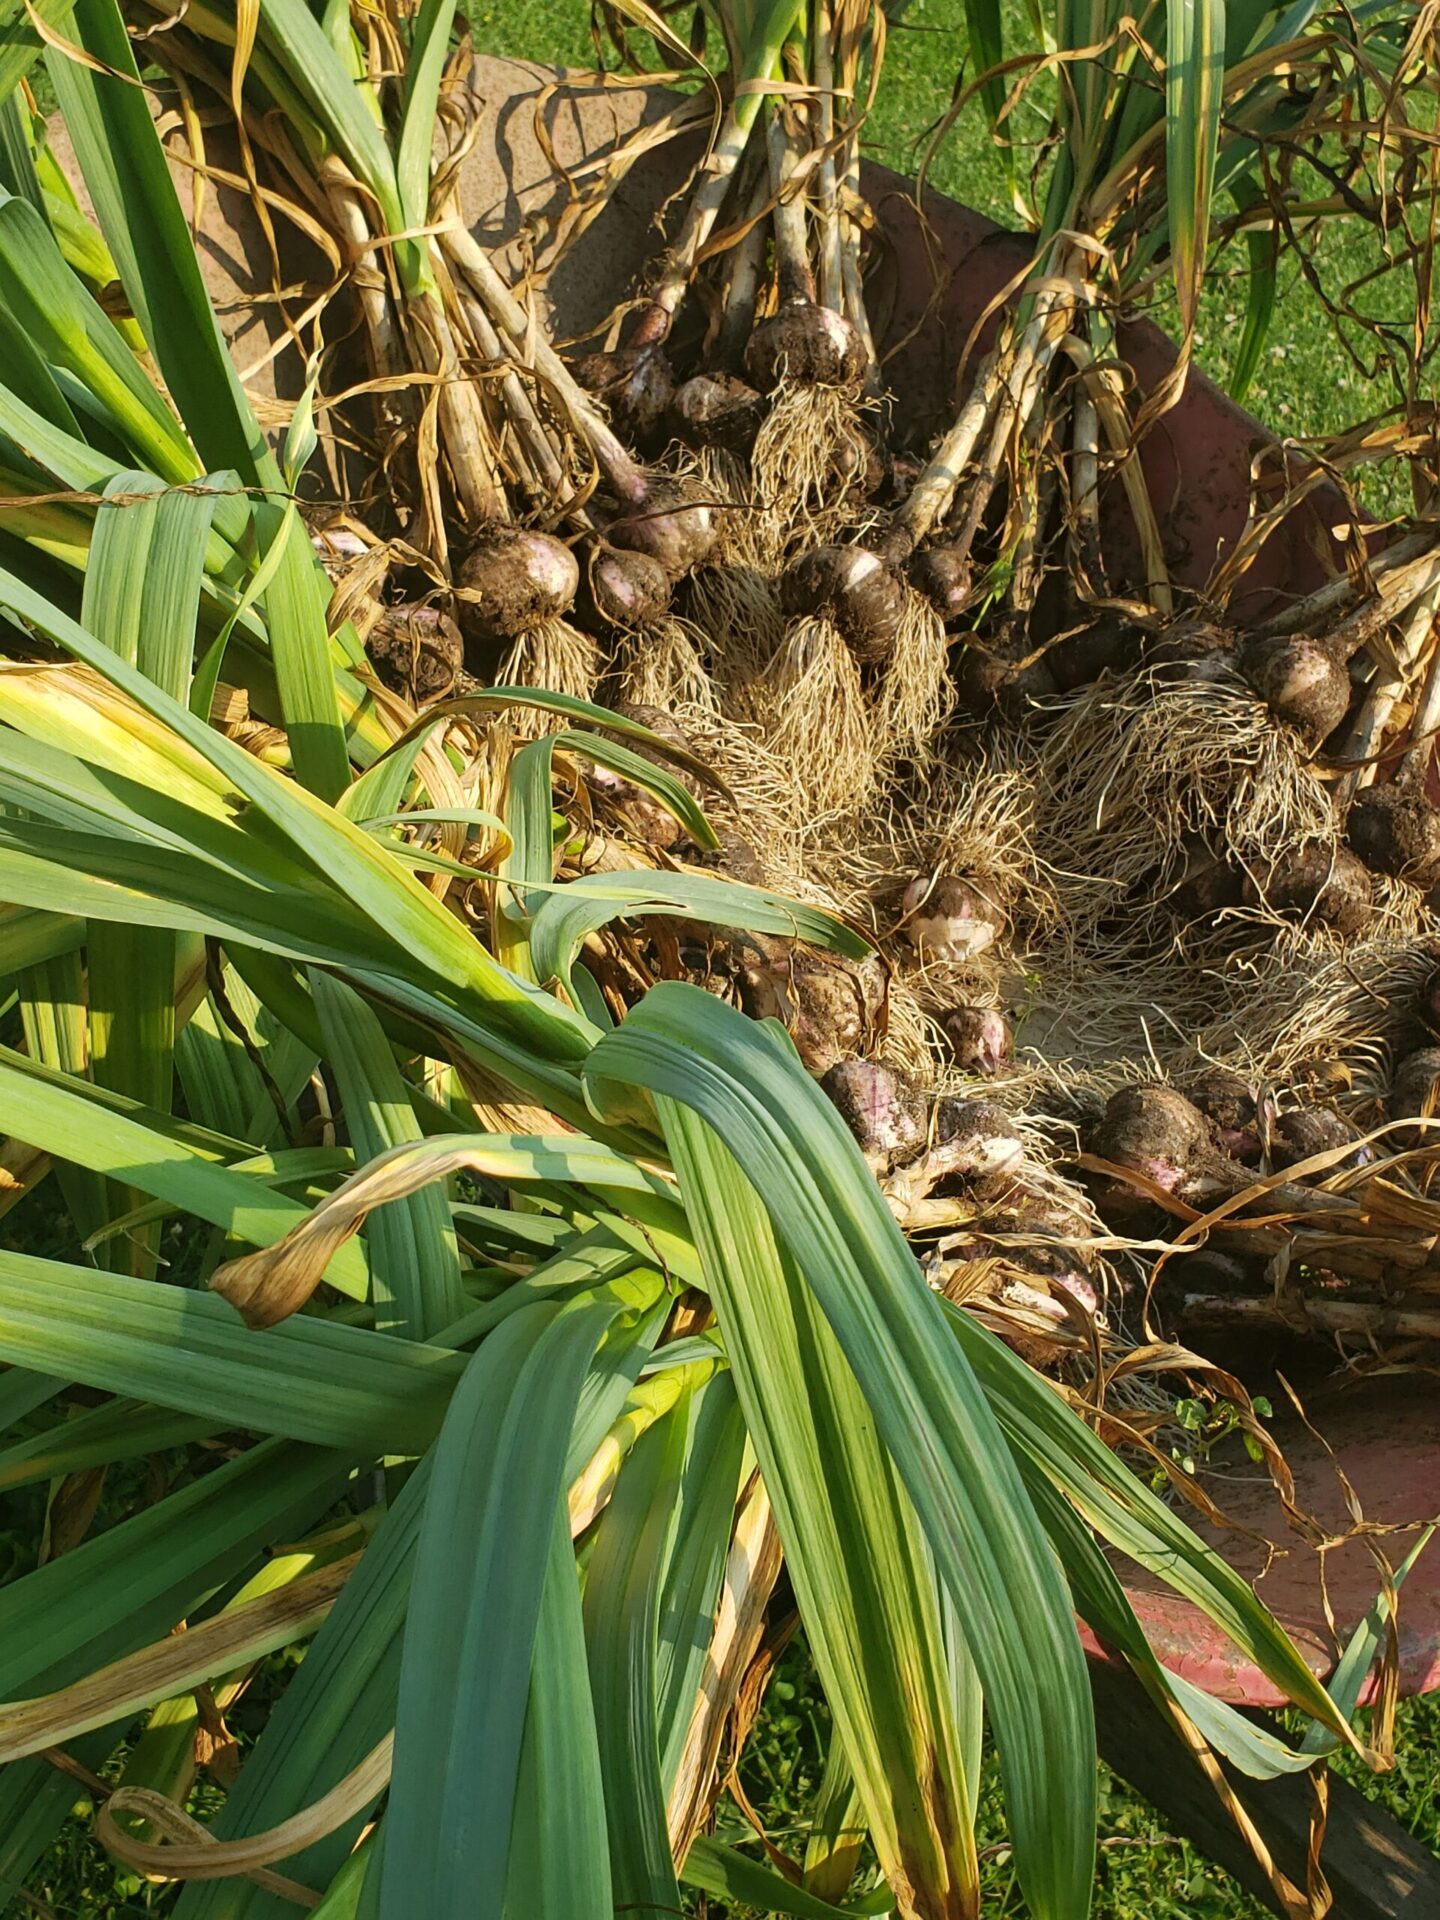
How to Cure, Prep, and Store Garlic

You’ve picked your garlic. But, now what? Let’s talk about how to cure, prep, and store garlic to get the maximum shelf life. (If you want to learn how to grow your own garlic, check out our post How to Grow Garlic in 3 Easy Steps.)

Once your bulbs of garlic have been plucked out of the ground, there are several steps to complete to get them ready for storage. First, “clean” freshly picked garlic. By this, I mean clumps of soil that remain on the bulb or roots should be brushed or shaken off. Your goal is to get most of the extra debris off of garlic.

At this point, some gardeners choose to remove the garlic tops by cutting them with shears or scissors. Others, like me, keep the tops on so the garlic can be bundled and hung to cure.

Whether growing hard- or softneck varieties, the garlic must be cured. Curing is a process that allows the garlic to dry out. If you are bundling the garlic, you can hang them, or you can lay loose garlic on a screened table. The goal is to get as much airflow around the bulbs as possible.

Hardneck garlic is bundled in packs of 10 by wrapping tops with twine.

Moisture is the first enemy of garlic, so airflow is critical to remove it. Get creative with your curing solutions. For instance, if you don’t have a wire table, think about items that you might already have that could provide aeration; cooling racks, daisy trays, or wire scraps can all create suitable drying surfaces. If hanging, string, hooks, bailing twine, or laundry line could make a temporary hanging structure. However, whether hanging or laying, make sure the selected area is dark. Light is is the second enemy of garlic –and both moisture and light create an environment for mold growth.

Allow your garlic to cure for 2-4 weeks. The time needed will vary depending on the humidity, size and type of garlic and temperature. Garlic is fully cured when the outer layers of garlic become papery and the tops are crispy and dry.

Left: Cured garlic Right: Cured garlic that has been cleaned for storage

Now it’s time to grab your scissors or shears!

Once cured, you can cut off the garlic tops, leaving about a 2 inch piece on the top of each bulb. Cut off the roots, brushing off any remaining soil that may remain.

Lastly, peel or rub off the outermost layer of paper to expose a clean layer.

At this point, your garlic is ready to be stored.

Place your prepped garlic in a breathable vessel. Wood crates, baskets, and paper bags are perfect for this because they allow for airflow. You can store your garlic at room temperature for several months without issue. To extend the shelf life, though, storing in a cool, dry place, like a basement or root cellar can preserve the harvest for even longer. We’ve been able to store garlic for over 10 months by doing the latter. Whatever you do, don’t put your garlic in the fridge! Not only will it create unwanted smells, this environment will introduce moisture to the bulbs, causing more harm than good.

We hope this answers your questions on how to cure, prep and store garlic!

How to Grow Garlic in 3 Easy Steps

Garlic. A cousin to the onion. Culinary deliciousness. Easy to grow.

Have you wanted to grow garlic, but haven’t the foggiest on how to start? Here is a step-by-step guide on how to plant it. But, before we start, let’s review the items you will need to grow garlic:

  • garlic bulbs (although some people say you could use store bought garlic, we recommend buying bulbs from a nursery center or gardener since it will be compatible with your growing area)
  • an area to plant that receives 6-8 hours of full sun (this could be a small plot in the garden or in some medium to large pots)
  • gloves (optional, but who wants dirty hands if it can be avoided?!)

OK, let’s get started with our step-by-step guide…

STEP 1-PLANT

First, determine when to plant garlic and plant it. I know this sounds vague, but depending on where you live and the type of garlic you are planting, the time frame in which to plant will vary. A general rule of thumb is to plant garlic on the day of the year with the shortest amount of daylight and harvest it on the day with the longest amount of daylight. Gardeners in my neck of the woods (Zone 6b) often use this guide: Plant on Columbus Day. Harvest on the 4th of July. Ideally, the goal is to get garlic in the ground before the ground freezes. The garlic will begin to develop roots before winter; growth will continue once the ground thaws in the spring.

The spring appearance of garlic!

Once you determine your planting date, break apart the bulbs into cloves several days before you are ready to plant. You can leave the paper on the cloves. On planting day, place cloves root side down, providing enough space for them to grow into bulbs. I usually space my cloves about 4 inches apart in rows that are about a foot apart. If you live in a colder region you may want to apply a layer of mulch; otherwise, forget about them until spring.

STEP 2-MAINTAIN

Pull a bulb to check on progress

Garlic is fairly low maintenance. As with most fruit and veggie plants, keep the area weeded. To help combat weeds and save on watering, apply a layer of mulch, like straw or grass clippings around the plants. There are methods to fertilizing garlic that can help to develop larger bulbs, but as long as you are using a rich soil and aren’t entering any garlic growing competitions, you really don’t need to fertilize.

Lastly, monitor for disease. As mentioned, garlic does not require much attention at all.

As a matter of fact, garlic is planted by some to deter pests from the garden; however, can be susceptible to thrips (small insects) and rot (a fungus) that can impact your garlic’s growth.

STEP 3: HARVEST

If you’re in an area where growing hardneck garlic is the only option, you will actually have two harvests: scapes and bulbs. Softneck variety growers, hang tight…

OK…hardneck growers, several weeks before bulb harvest, you will notice thick stalks with a tapered bulb growing out of the middle of your plants. The stalk, called a scape, will rob energy from the bulb and form a flower. It should be cut from each plant to allow the energy to go into bulb production. The bonus: scapes have a lovely mild flavor and can be added to lots of dishes where a bit of garlic flavor is wanted.

On harvest day, both softneck and hardneck growers, can carefully harvest their bulbs. In loose soil, grab at the base of the plant and pull up gently. If there is resistance, you may want to use a small shovel to loosen the soil around the bulb. Shake excess dirt off of the bulb and roots. Then, give yourself a pat on the back…you’ve successfully grown garlic. If you want to know what to do next, read our post on How to Cure, Prep and Store Garlic.

Feeling super successful? Try adding these 3 items to your garden planting list!